Friday, August 9, 2013

Energy Star Certified Lighting

Most Energy Star-qualified fixtures come with pin-based CFLs, which makes it more difficult for people to swap them out of less energy efficient incandescent bulbs after initial use. However, not that some Energy Star outdoor fixtures will accept an incandescent bulb because they save energy through a  motion sensor and or photocell.

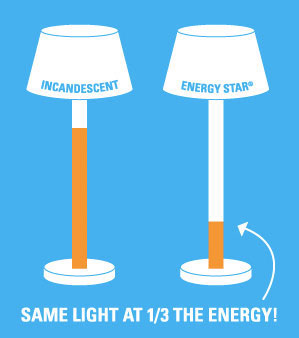
Energy Star-qualified fixtures are readily available in the marketplace and come in hundreds of popular styles, including floor, table and desk lamps as well as in a hard wired style for typical ceiling, wall, bathroom or outdoor light fixture. Many of these light fixtures and bulbs support an automatic daylight sensor, dimming switch or motion sensor.  According to Energy Star, if every home in the US replaced the five light fixtures it uses most with registered models, it would prevent greenhouse gases equivalent to the emissions of nearly 10 million vehicles.  That is an impressive number!

An Energy Star Qualified light fixture has the following characteristics:
  • They use one-quarter the energy of traditional lighting fixtures
  • They must distribute light more efficiently and evenly that other standard fixtures
  • They support bulbs that must last at least 10,000 hours. (Typical light bulbs like incandescents last 1,000 hours)
  • They carry two-year warranty which is double the industry standard

Thursday, July 11, 2013

Aspects of a Full Home Energy Audit

Many homeowners are looking for ways to make their home more energy efficient and save money on their utility bills. Often times the energy company that performs a free home energy audit only checks obvious areas like lighting and air sealing.
It is important that your home energy auditor performs a complete home energy audit. Vital aspects of your home that should be checked in a home energy audit include:


*Heating and cooling system: Learning about the energy efficiency of your heating and cooling system is essential. If this is not checked there could be an abundant amount of energy being lost that you do not even recognize. Heating and cooling accounts for a large amount of energy use in your home and can be a major source of energy loss as well. Getting a complete home energy audit that assesses your heating and cooling system is something that you don't want to go without.
* Sealing: Although air sealing throughout your home is an obvious check, make sure it fully evaluates the air sealing. Simply checking around windows is not enough for your energy audit. A proper one should check for air leakage in your attic, foundation, and around any vents that may be letting in unwanted air.
When places are found throughout your home that are not sealed properly, it should suggest fixes such as insulation in the attic or basement, caulk and weatherstripping around doors and windows, and foam gaskets behind outlet and switch plates on walls. These fixes will keep in the conditioned air so that you are not wasting energy heating or cooling the outside, unconditioned air.
* Insulation: They are only complete when the insulation in your home is fully assessed. Many homeowners believe they have enough insulation in their home when this may actually be a major cause of energy loss. Simply checking to see if there is enough insulation is not a complete energy audit either though. Assessing your insulation r-value is essential.

Read more here

Wednesday, July 10, 2013

How to Measure the R-value of Attic Insulation [VIDEO]

Here is a video from REenergizeCO in Denver, Colorado.  They talk about measuring R-value in insulation and the correct amount needed in an attic of a residential home.  Nearly 50% of homes in the US do not have an adequate amount of insulation in their attic and suffer with higher utility bills.  This video shows you how to detect if your home has enough attic insulation.
 

Tuesday, July 9, 2013

7 Steps to Energy Savings

If you are afraid to open your gas or electric bill each month, reducing your home's energy use should be a priority of yours. Energy efficiency and pleasant indoor environment work hand in hand.  In this article you will learn how to evaluate your home's energy performance, determine where the biggest savings lie and maintain a healthy indoor environment.  You can find your home more comfortable and reduce your utility bills by following these 7 simple steps:
  1. Hire an Energy Auditor
    When it comes to saving energy, it is worth hiring a pro to evaluate your home and help you sort out the many possible energy-savings strategies.  If you are not sure how to find an energy audit company in your area, contact the local utility company to find energy auditors. It may supply this service for free or recommend an auditor.
    An energy audit typically costs between $250-450 and can be subsidized through a tax credit or community program.  The energy auditor will inspect your home and rate its current performance in terms of insulation levels, air leakage, condition of heating and air conditioning equipment and some other criteria.  The auditor can then tell you which upgrades are cost effective and estimate your energy savings. Cost-effectiveness is the absolute key! You can spend thousands of dollars for upgrades that won't save you much and a good auditor will steer you away from those. For an improvement to be worthwhile, the estimate savings should cover the cost of the improvement in about seven years.  An example being adding $200 in attic insulation will be worth it if you can save $30 a year ($210 after seven years).  Make sure the audit includes estimated savings for any improvements.
  2. Reduce Air Leakage
    Think of the warm air leaking out through gaps, cracks and holes in your home's walls and ceilings as your energy dollars floating away.  Sealing these openings is one of the greatest ways to save energy and is actually the most cost effective too.  Stopping air leaks in your attic is usually enough. You don't have to work your way through every room caulking every crack inside and out - you just need to cover the largest.
  3. Conserve Energy
    There are hundreds of energy savings steps that cost little to no money. Some ideas involve small investment of time and money like a programmable thermostat or caulking around windows, lowering the temperature on your water heater and closing your curtains.

Tuesday, June 25, 2013

20 Tips to Save Energy Around the Home

The best part about this list is all of these tips are FREE!  They won't cost you a dime and actually help you save energy and lower your utility bills for your home.
  1. Close the fireplace damper when you are not using your fireplace.  If it is never used, seal the flue with a plastic bag stuffed with insulation.
  2. Lower the indoor temperature a few degrees in the winter months.  You can add an extra blanket on your bed and lower it even more at night, up to 10 degrees when you're on vacation.
  3. Close off unused rooms and lower the temperatures by adjusting your registers and dampers. This can save you up to $50 a year alone.
  4. Open your shades or blinds to let in sunlight during the day and close them at night to reduce heat loss. For cooling, close them fully during the day in summer months.
  5. Clean your furnace's blower fan with a soft brush and vacuum cleaner.
  6. Ventilate and cool your home with window or whole house fans during the cooler hours of the day.
  7. Skip the dishwasher's drying cycle to cut energy use in half!
  8. Wash clothes in cold water rather than warm.
  9. Make sure to full fill washing machines and dishwashers for more efficiency use instead of partially full loads.
  10. Turn off lights that are not in use. Reduce bulb wattage and use dimmer switches.
  11. Clean you washer and dryer filters after each use.
  12. Flush your garbage disposer with cold water rather than hot. Grease solidifies in cold water and will wash away.
  13. Clean your refrigerator coils with a soft brush each spring.
  14. Run major appliances late in the evening or early morning to keep temperatures down in summer months and avoid heavy electric loads.
  15. Cook more efficientyly using microwaves, crockpots and pressure cookers.
  16. Ride your bike for neighborhood errands instead of your car.
  17. Turn off room air conditioners when you leave for an hour or more.  A room can quickly cool down when you turn your AC unit back on.
  18. Reduce humidity in bathrooms and kitchens wih exhaust fans. When dehumidifying your basement, close doors and windows.
  19. Lower your water heater setting to 120 degrees for energy savings.
  20. In warmer weather, set the thermostat higher, 74-76 degrees, and rely on your ceiling fans for cooling even when your air conditioning system is on.
Here are some helpful videos about home insulation.  Another great way to save money on your energy bills:
  1. Attic Insulation
  2. Crawl Space Insulation
  3. Home Energy Audit

Thursday, May 2, 2013

Using Blown-In Insulation

If you need to create warmth inside your attic, save big by blowing inside insulation warmth oneself. The good qualities cost $1, 500 in order to $2, 000 to complete the 1, 200-sq. -ft. household. You can apply that oneself for approximately $500. Spitting out attic warmth isn’t tough, nevertheless it’s messy, exhausted operate. To create that less complicated, get the tool in addition to reserve a couple days: just one with regard to attic preparation plus the minute to truly knock back your warmth. From the stop on the weekend break you’re going to possibly be uncomfortable in addition to worn out. But keeping $1, 000 or higher may make up for your tender back.

This long-term benefit is outstanding as well. You can observe your efforts bills drop by approximately 15 in order to 25 % based on your weather in addition to active amounts of warmth. And you will in addition be entitled to the tax credit ratings about the expense of your warmth.

To demonstrate you tips on how to get the job done right, most of us questioned your skilled to express their methods for creating the project proceed effortlessly in addition to enable you to prevent the top several attic-insulation mistakes.

Seal leaks

Yank back the existing warmth in addition to utilize increasing bottle of spray froth in order to close any kind of breaks all-around plumbing water lines, ceiling perforations in addition to slots where by electric powered wire connections snake by means of. “Make confident in order to close all the way up about the water pipe, ” says Olson. Pertaining to breaks 1/4 inside. as well as a smaller amount, utilize caulk rather than increasing froth.

Add ventilation

Yank the existing warmth from your roof. Placement the newest in-take chute therefore the bottom part expands 6 inside. to the overhang in addition to staple that in location. Olson recommends using a contract stapler instead of the retracted stapler. “It’s additional precise in addition to there’s a smaller amount chance you’ll crumple your chute. ”

“In 95 pct on the households most of us work with, your in-take chutes usually are missing out on as well as aren’t correctly set up, ” says Olson. With out these, you’re not having the almost all through your insulation’s R-value since oxygen would need to move correctly on the eaves to eliminate wetness within the wintertime in addition to temperature within the summer time.

To ensure active chutes aren’t impeded, stand within a darker attic to see whether light on the eaves is selection throughout the vents. Exchange any kind of chutes which might be impeded, ruined as well as missing out on. You’ll uncover equally plastic-type material in addition to froth in-take chutes in the home facilities. Olson advises employing froth chutes. “They’re additional strict in addition to there’s a smaller amount prospects for these having crumpled as well as squeezed any time you’re putting in these.” Yank back the existing warmth to help you to observe out there to the border on the eaves, in addition to purchase a in-take chute in each and every rafter room.

Insulate access ways

Cover your attic hatch that has a cushion regarding fiberglass warmth. “You want a pleasant, big puffy cushion regarding warmth to avoid any kind of oxygen water leaks, ” says Olson. Slice a couple levels regarding R-19 fiberglass batt insulation slightly larger than your hatch in addition to staple duct recording to the hatch sides in order to safe that set up.

To hold your warmth by decreasing throughout the attic hatch launching, complete a 2x12 dam about the hatch border. “Then, to actually close your attic entry way up snug, ” says Olson, “lay fiberglass batt warmth on the inside of your hatch as well as door in addition to put that way up snug being a Holiday present." You'll be able to insulate your hatch door even though you’re into the attic as well as go the entrance way out there in addition to do it additional easily with a tarp outdoors.

Mark reference points

Compare well on the drywall in order to tag your sought after warmth level. Start using a long term gun in order to tag the particular level each and every number of trusses and that means you know you've even insurance about the entire room.

When you're blowing warmth, it could find messy in addition to tough to see whether you have got that serious ample about the entire attic. Mark the desired level about diverse roof trusses about the attic when you star.
Friday, April 5, 2013

INSULATING YOUR HOME WITH A PREMIUM EXTERIOR PAINT JOB

Save energy costs and insulate the outside of your home with meticulous practices. Insulate the outside of your home with a NASA-inspired insulating paint product.

• Techniques to Save Energy Costs While Painting Your Home

Windows and doors and clothes dryer vents are where most conditioned air escapes and unwanted exterior air sneaks in, costing the homeowner money in his or her energy bills. A quality exterior painter knows this, and will seal gaps not just for aesthetics but to save you money.

First and foremost: siliconized caulk. Gaps around windows and doors need to be caulked before they are painted. Make sure the surface is clean and free of dust and grease, then apply a bead of caulk and smooth it with your finger so it fills the gap. This will help make the doors and windows airtight. This can save you up to $100 per year.

Secondly, when painting window sashes and their glazing it is a good idea to leave a line of paint over the glazing and on the glass that is roughly 1/10th of an inch wide – this well help create an airtight barrier on the glass pane and the glazing, preventing any drafts from entering the home.

Also, make sure to repair or replace rotted wood trim and siding. If not, moisture and air can find its way inside and adversely affect your energy bills, while compromising the structural integrity of your home.

Remember:
The exterior paint on your home is the skin that protects its structural elements from the weather, so a high-quality, professional paint job is important to your home’s longevity.

  • Insulating Paint inspired by NASA: The Next Big Thing?

Insulating paint, or radiant barrier paint, is a relatively new product that is still under scrutiny. This type of paint essentially uses traditional paint with an additive that’s main purpose is to reduce the build-up of heat, thereby insulating the building from the outside. A similar type of coating is already used today on piping and ductwork.